Instant Pot Korean Beef | Cooking Through Construction

IMG_9418editedIf you ask my boys, they’ll tell you we rarely have the same thing twice.  I have a handful of favorite recipes that I make over and over again, but usually I’m scouring the internet and my cookbooks looking for new and different things to try.  Sigh…I miss my cookbooks, packed away until the kitchen is completed.  The boys often have to request a meal they miss if they want me to make it again.  Jake has meatball subs in the request pile right now actually.

One of my go to meats to cook with is ground beef because it’s a meat Jake doesn’t usually have an issue with.  Some of his favorite meals include meatballs (see above), meatloaf, and sloppy joe.  Oh and the spaghetti with meat sauce from Wednesday.  You’ll notice all of them have ground beef as the base.  So when I was making my weekly meal plan last weekend and wasn’t inspired by anything on Pinterest, I googled “low carb ground beef recipes” to see what I could come up with.

IMG_9421editedYou see, not only am I cooking without a kitchen, I’m trying to lose a couple pounds before my best friend’s wedding in early April.  I’ve done a decent job so far, but to be honest I’m starting to lose track a bit!  With a night of burger eating in my future, it’s not looking too good…  Yikes!

Anyhow, I searched for the recipes and came across Korean Beef Bowls, which sounded interesting.  I love Asian flavors so anything that has Chinese, Japanese, or Korean in the name is probably up my alley.  Furthermore if they include garlic and ginger, I’m in.

I read through the recipe and decided it was a go!  The best part was I could make everything in my Instant Pot or on my stove, whenever I get that back.  And, unbeknownst to me, the boys were going to love it!  Quick, easy, and a crowd pleaser.  I think that fits the bill in my house.

IMG_9417editedKorean Beef Bowls
(adapted from this recipe)

1 tbsp sesame oil
1½  pounds lean ground beef
3 cloves garlic, minced (or 1 heaping tbsp garlic paste)
½ tsp Stevia drops (or ½ cup sugar)
½ tsp molasses
¼ cup soy sauce
½ tsp fresh ginger (or use the Gourmet Gardens paste…seriously I love this stuff)
½ tsp crushed red pepper flakes (or more if you like it spicy)
1 tbsp honey (if desired)
1 bunch scallions, chopped
Sriracha (if desired)

Turn your Instant Pot on saute and heat your oil.  Brown your ground beef, breaking it up as you go.  Drain beef if needed.  Add your garlic, Stevia, molasses, soy, ginger, and crushed red pepper flake.  Cook for 5 minutes until flavors have combined.

This is where I deviated a bit from the original recipe.  I tasted the recipe and decided I wanted it a bit sweeter, plus I have an issue with fake sugar sometimes.  It leaves a taste in my mouth I don’t always love, so I added a drizzle (or two) of honey.  I believe it ended up being about a tablespoon.  Then I stirred it up again and tasted it.  Yum!

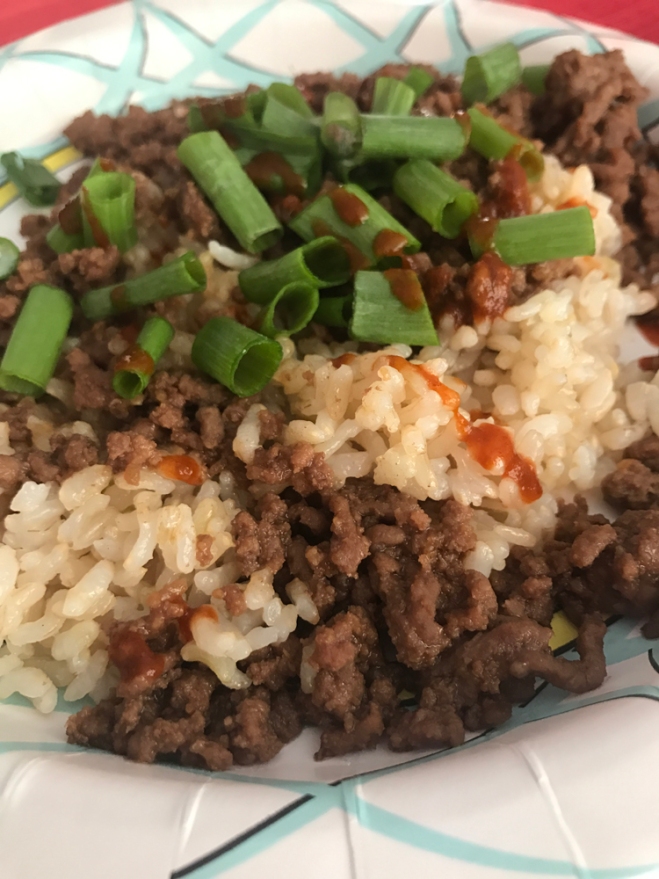
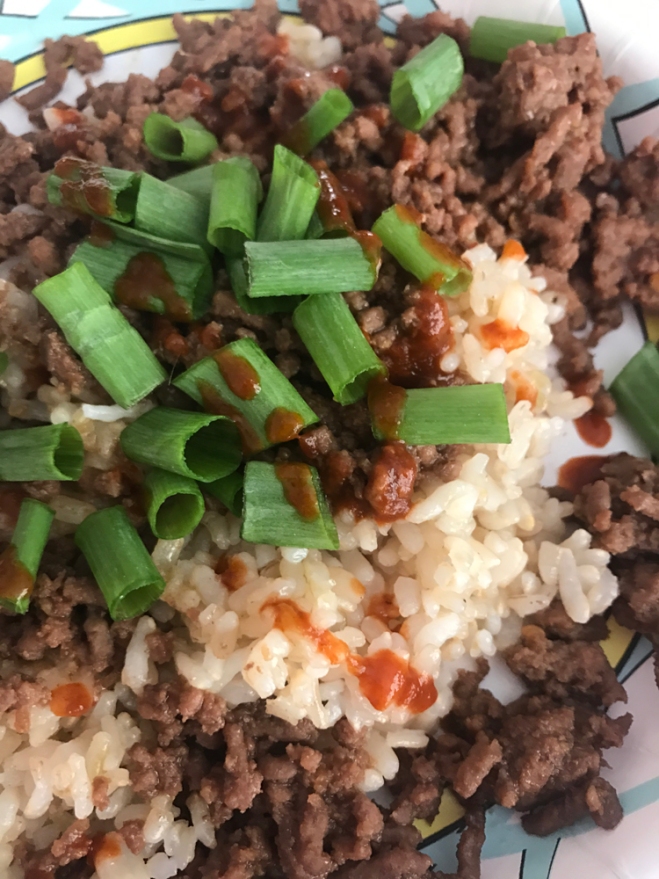
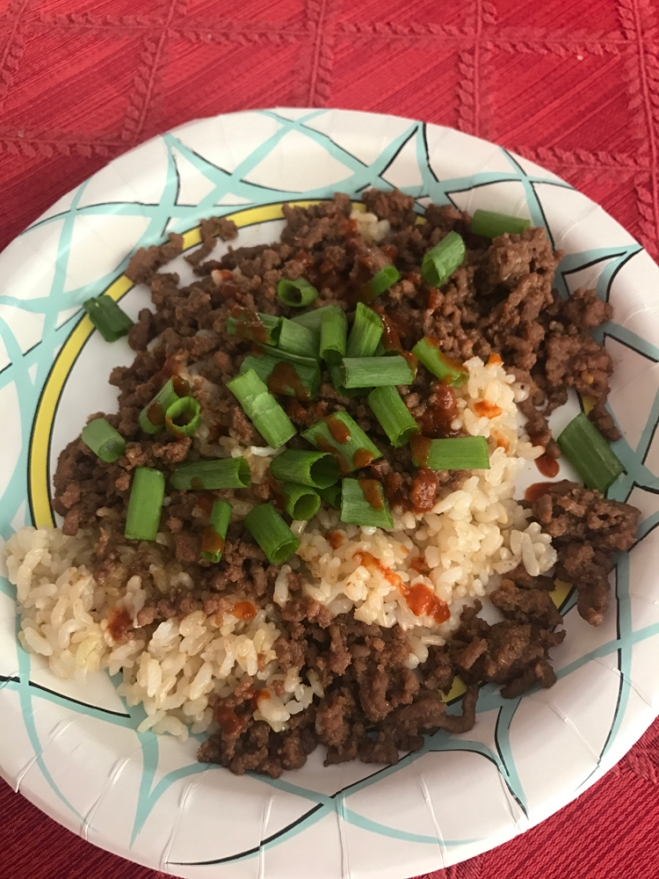
I served the beef over Trader Joe’s frozen brown rice (a HUGE timesaver in my house) with a drizzle of Sriracha and a sprinkle of scallions.  Both boys raved about it and Jake finished an entire plate!  And it wasn’t small either!

If you are truly trying to do low carb (like I should have been), you can serve this over cauliflower rice instead.  I’m not a big fan of cauliflower so, while I try to get on board with this trend, it can be hard for me sometimes.  Regardless, this beef is worth a try.  Jeff commented that it would be good in tortillas too.  Asian tacos…future blog post maybe?

Meatballs…Not Just for Italians Anymore | Cooking Through Construction 

I’ve been doing A LOT of cooking in the basement and, guys, it’s a breeze!  Really!  It’s all about the set up and having the right tools.  Once I set up my long, white table with various cooking utensils, spices, seasonings, and (most importantly) my Keurig, it was simple after that!  Plus, the tool that’s making it all possible…my Instant Pot.

71-ak79nv1L._SL1500_
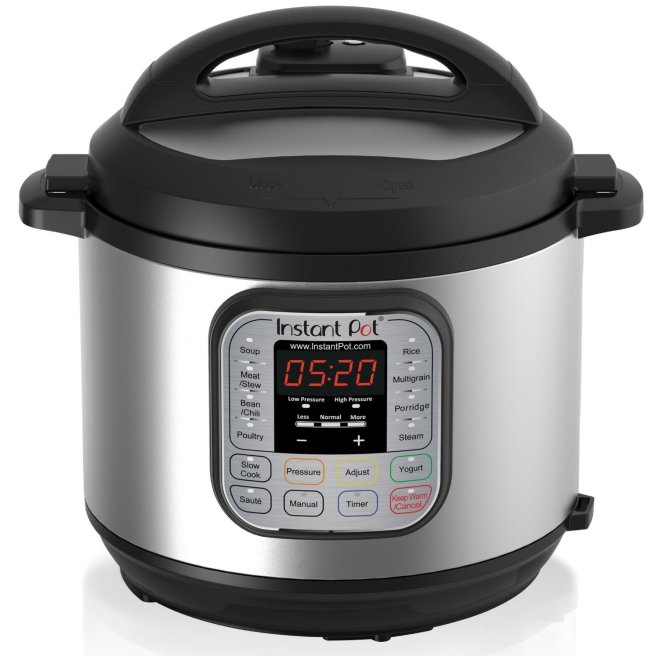
Special PSA about the Instant Pot:  if you’re a busy mom or new to cooking or a retired person or if you like to eat in general, you need an Instant Pot.  Let me repeat.  You NEED an Instant Pot.  You can order it right here.

I’ll wait.

Now that that’s out of the way, I can tell you about the two awesome meatball recipes I’ve made in our Basement Bistro.

First, we departed from the norm and tried Asian.  I know what you’re thinking…Asian?  In meatballs?  Ugh…  But trust me.  They were AWESOME.  They were so awesome in fact that I didn’t even snap a picture!  Jake gobbled them up and asked for seconds!  He never asked for seconds when it comes to meat!  He even asked when I could make them again.

A few nights later, we went Swedish and had some of their meatballs.  And the best part was I didn’t even have to cook the noodles!  Everything was cooked in one pot at the same time! You know what that means?  Daddy got dish duty.  The one thing I would change with this recipe is the cook time.  I didn’t trust the cook time in the recipe I followed, so I upped the amount.  What resulted was overcooked noodles.  But the rest of the recipe was still delicious!  Don’t worry…I adjusted it for you already.

If you’re family is like mine and loves meatballs, try either (or both) of these recipes!  I promise you they’ll be a hit.

img_91781.jpg
Meal #1
Asian Meatballs with Rice
(adapted from this page)

1.25 lbs ground turkey
1 tbsp garlic
1 tsp ground ginger
2 tbsp soy sauce
2 tsp sesame oil
1/3 cup Panko breadcrumbs
1 large egg
1/4 cup chopped cilantro
Honey (optional)
Trader Joe’s brown rice (optional)

Mix all ingredients in a bowl and roll into 1” balls.  Preheat Instant Pot on “saute” and cook your meatballs for 5 minutes, turning to brown each side.  Add ½ cup soy sauce.  Cancel your Instant Pot and hit “manual”.  Add cover to instant pot, making sure the valve is closed.  Choose “manual” high pressure and cook for 15 minutes.

When your pot beeps to let you know it’s done cooking, let the pressure release naturally while you heat up your rice.  In this case, I chose to use Trader Joe’s brown rice because it’s easy.  If you opt to cook your own, it’s best you start both the rice and the meatballs at the same time.

Once your meatballs are finished, drizzle them with honey to sweeten them slightly if you like.  Serve over rice with extra soy sauce or, my favorite, Frank’s Sweet Chili sauce.

I really kick myself for not taking a photo of these meatballs.  We were all so hungry, they vanished before I even thought about it.  The one above is the only one I have so it’ll have to do.

This meal is declared a “freezer meal” on the original page.  You can make all your meatballs ahead of time and throw everything in the pot the night of.  The IP will cook the meatballs from frozen in the same amount of time it cooked the thawed ones.  I don’t know why…I don’t make the rules. (Name that movie, anyone??)

IMG_9220

Meal #2
Swedish Meatballs
(from this recipe)

1.5 cups low sodium beef broth
1/2 cup milk
1 can cream of mushroom soup
16 oz egg noodles
one 24oz bag (frozen & fully cooked) meatballs
1 block cream cheese

Mix the beef broth, milk, and soup in your Instant Pot.  Cover with egg noodles.  Top with meatballs.  Press “manual” and let cook for 8 minutes.  Once the pot beeps, release the pressure.  I like to add a hand towel to the top so it doesn’t splatter soup steam all over.

Once the pressure switch drops, remove lid and mix in your cream cheese.  Serve to hungry boys!

I hope you try these recipes and find something you like!  What is your favorite meatball recipe?


A Little Slice of Summer

IMG_7558editedI don’t know about you, but I’m dying for it to warm up!  For the last few weeks it has been downright frigid outside!  I’m talking in the negatives, y’all!  (BTW…since when have I started saying “y’all”?  Going back to my TN roots I guess…)

My mom came to visit a few weeks ago and announced one day she was going to make ribs.  Ribs? In winter?  Uh…OK…

She swore they were just as good as being on the grill.  I was a bit skeptical, but I sat back and let her rule the kitchen.

You guys.  Yum.  Seriously.  These ribs are not quick, but they are soooooooo worth it.

Trust me on this one.

IMG_7556edited

Oven Ribs

1-2 racks of boneless baby back ribs
1/4 cup Worchestershire sauce*
1/4 cup liquid smoke*
1/2 onion, thinly sliced
4 cloves of garlic, peeled crushed
Steak seasoning
Salt and pepper if needed
Extra wide aluminum foil

*You can vary the amounts of these ingredients as long as they make up roughly 1/2 cup.

Preheat  your oven to 250°.  Working over a large baking sheet, tear off a few sheets of aluminum foil.  You’re going to make a package out of the aluminum foil to slow cook your ribs in.

Put the ribs on the foil.  Trim off any excess fat you don’t want.  Sprinkle your ribs with the steak seasoning, salt, and pepper (if needed).  I prefer the Dorothy Lane Market Grilling and Seasoning Rub, but it’s your choice.

Layer the onions over the ribs and scatter the garlic over the ribs as well.  Pour the liquid over the ribs.  Grab the longer sides of the foil, bring them together over the ribs, and roll until the foil is just touching the ribs.  Then roll up each of the two sides.  You want to leave a little bit of space for the steam inside the package to circulate.

Put in the oven and let cook at 250° for at least 5 hours.  The longer you cook them, the more tender they are.  One hour prior to dinner time, remove the ribs from the oven, open the package, and spread the ribs with your favorite BBQ sauce.  Put them back in the oven for the last hour, uncovered, and let the BBQ sauce cook into the ribs.

These ribs come out so tender, juicy, and flavorful it’s unbelievable.  You can literally pull the bones right out.  This method is perfect for making a rib sandwich!

IMG_7557edited

Oh yeah…and they’re toddler approved.

Meal Plan: February 2013

Everyone has a hard time figuring out what to cook.  I was talking to a co-worker this weekend and she told me that, while she was going back to school, she asked her husband to cook dinner on Thursday nights as it was her busy day.  He replied that he would cook, but she needed to tell him what to make.  She exclaimed that that was the hardest part!

I completely agree.  I love to cook, but sometimes I just really don’t know what to make.  My husband is no help because he never has any ideas for me.  I asked him the same question each week.

What do you want for dinners this week?

He responds one of two ways:

Meatloaf. 

Or

I don’t care.  Whatever you make.

Ugh!  Finally, I got smart.  A few years ago I started meal planning.  I must say…when I do it and stick to the plan, it really makes a difference in my day!  I don’t have that dreaded feeling hanging over my head of what to make.  I typically am more prepared and have the ingredients on hand.  I don’t have to try to figure out how to pick up the ingredients I’m missing and still make it home in time to have dinner on the table by 6p (Jake’s dinner time).

I realize many of you feel the same way, which is why I’m hopefully starting a new series on this blog.  I’ve tried in the past to post menus and failed miserably, so take that as your warning.

Jake eats most anything we eat aside from fish, shellfish, and nuts of any kind (though I did slip and give him some peanuts with my Thai food the other day.  Whoops!).  Some of the dishes are spicy (like the Cajun Chicken Alfredo and the Spicy Chicken Tortilla Rollups).  I figure I’ll just make a couple without the spice or he will have leftovers that day.  In any case, this may help lots of you moms out there!

I also plan to lighten up some of the more calorie dense meals to make them more Weight Loss Goal friendly.  Stay tuned for more on that later.

Screen Shot 2013-01-28 at 10.01.55 AM

Here’s the key to reading the calendar.  The light green recipes are from my Pinterest account.  The light blue ones are either from my blog or from my personal collection of recipes.  Here are the links to the recipes you can find online:

Burgers
Cajun Chicken Alfredo
Chicken Bacon Ranch Mac & Cheese
Chicken Cassoulet
Chicken Cordon Bleu
Chicken Taco Chili
Cilantro Lime Chicken
Cream Cheese Chicken
Crispy Southwest Chicken Wraps
Forgotten Chicken
General Tso’s Chicken
Honey Garlic Pork Chops
Meatloaf
Mexican Lasagna
Mini Corn Dog Muffins
Mushrooms Pizza Bites
Pad Thai
Pizza Casserole
Pork Chops au Poivre
Proscuitto Panini
Quick Coq au Vin
Spaghetti with Chicken and Thai Peanut Sauce
Spicy Chicken Tortilla Rollups
TJ (Trader Joe)’s Chicken Satay with Coconut Rice
Ultimate Chicken Fingers

You probably notice there isn’t any room for leftovers.  Most of the time, we either eat the leftovers for lunches, or I try to make a single night’s portion instead of a whole family’s worth.  The food gets eaten, don’t you worry.

I hope you guys enjoy this post!  If this is something you enjoy seeing, please let me know by leaving me a comment on my blog.  You can also show your support by liking my Facebook page!  I’d love to hear from you!

Three Little Soups (Part 2)

The other day, I got ambitious and decided to make three very different, very unique soups.  You can check out my recipes for Vegetable Tortellini and Beef Pho here.  If you’re more into spicy, meaty, and hearty, keep reading.

A long time ago, I received a Cuisine at Home cookbook in the mail.  It was one of those trial offer type things I usually throw away, but when I read “Absolutely no ads!” on the cover, I thought I’d take a peek inside.  I was blown away by the various recipes I discovered in the pages.  Not only did the magazine include delicious looking recipes for Shrimp Risotto, Greek Chicken Roulades, and French Onion Salisbury Steak, it was brimming with information.  Everything from making your own pizza dough to the best way to crust chicken (for Pecan Crusted Chicken Salad) to tips and timesavers from the readers leapt from the pages.

As I was pouring over my cookbooks, magazines, and Pinterest boards, I stumbled on my Cuisine At Home cookbook.  I knew I liked most everything in the magazine and wondered if they had any yummy soups I could add to my cooking list.  There, on page 47, sat a delicious looking brothy soup staring back at me.  I read the ingredients list and saw it called for Mini Bacon Meatballs.  SCORE!  I scribbled the ingredients list down and bolted for the grocery store.  Mini Bacon Meatball soup was waiting!

Mini Bacon Meatballs
(from Cuisine at Home meatballs)

2 strips bacon, diced
1/4 cup diced onion
1 clove garlic, minced
1/4 pound ground sirloin
1/4 pound ground turkey
1/4 cup dry bread crumbs
2 tbsp minced fresh parsley
1/2 tsp paprika
1/2 tsp kosher salt
1/2 tsp black pepper
1 egg, beaten

Preheat oven to 400º.  Spray a broiler pan with nonstick cooking spray and set aside.  Cook bacon in a saucepan over medium heat until slightly crisp; set aside on paper towels.  In the same pan with the bacon drippings, cook onion until softened.  Add garlic to pan and cook until fragrant (about 1 minute).  Do not burn garlic.  Set aside to cook slightly

In a large bowl, combine meats, bacon & onion mixture, bread crumbs, spices, and egg.  Mix until combined.  Use a small scoop to form mixture into balls.  You want them to be about 1 inch in diameter (or bite sized).  Place on broiler rack and bake for about 10 minutes or until cooked through.

Remove meatballs from oven and let cool.  I made a double batch and intended to freeze half, but I kept nibbling on them throughout the day.  I even made a “cheeseburger”.  In other words, I heated a few meatballs, topped them with American cheese, and ate them with ketchup.  Oh my.  They were so delicious!  One of my favorite parts about these meatballs are the little bacon pieces sticking out.  Delish!

Now…on to the soup!  I had no idea what the title of the recipe meant, but I sure did think albondigas was fun to say!  Al-bon-dee-ghas!  Upon further googling, I discovered this word was Spanish for Mexican meatball soup.  Yum!

Albondigas Soup
(from Cuisine at Home magazine)

1 cup diced onion
2 tbsp olive oil
4 garlic cloves, grated
2 tsp chili powder
2 cups low-sodium chicken broth
2 cups water
2 corn tortillas, sliced in small strips
1 cup halved grape tomatoes, divided
1 can whole kernel corn, drained
2 cups sliced button mushrooms
1 recipe Mini Bacon Meatballs
2 tbsp torn fresh cilantro (optional)
sour cream (optional)

Heat olive oil in a large stock pot over medium heat.  Saute onions until softened.  Add garlic and chili powder; cook 1 minute.  Add broth, water, corn tortillas, and 1/2 cup tomatoes.  Simmer for 5 minutes.

Puree soup with an immersion blender (or in a regular blender).  Strain soup through a mesh strainer and return to stock pot.  Add corn, mushrooms, and meatballs.  Simmer over medium-low heat for 5 minutes.  Season with salt, pepper, and lime juice before serving.  Garnish with cilantro and sour cream if desired.

Swiss Burgers

I love burgers.  In fact, if you gave me a choice between steak and a cheeseburger, it would be a very tough decision for me.  I’m not quite sure what it is about the burger.  Maybe it’s the juicy, well seasoned beef.  Maybe it’s the melty cheese.  Maybe it’s just because I like dipping things in ketchup.

It could be all three.

No matter what the reason, I made a killer burger the other night.  I recently purchased Balsamic Glaze from Trader Joe’s.  After I had it on some grilled pizza, my brain started churning.  I immediately thought of putting it on a burger of some sort.

After a few minutes of brainstorming, I came up with what I believe to be a truly great burger.  Brace yourself.  Swiss burgers topped with caramelized onions and balsamic glaze on a toasted brioche bun.  *DROOL*

I just gave you an idea for dinner this weekend, right?  You’re welcome.

Swiss Burger with Caramelized Onions and Balsamic Glaze

2 white onions, thin sliced
1/2 tbsp olive oil
1 pound 80/20 ground beef*
salt
pepper
1 tbsp Worchestershire
Trader Joe’s Balsamic Glaze
4 Brioche rolls

The onions take about 45 minutes to caramelize fully, so plan ahead and start them in enough time to eat them with your burgers.  In a small pan over medium high heat, add olive oil and onions.  Toss to combine.  Once the onions start sizzling, you can turn down the head to low and let cook, stirring occasionally.  Do not salt them at this point.  Salt will bring out the water in the onions and they will take longer to caramelize.  Once your onions are golden brown and very soft, they are done.

Preheat your grill.  In a small bowl, season your ground beef with salt, pepper, and worchestershire.  Mix to incorporate but don’t over mix or your beef will get tough.

Level out your meat in the bowl and divide it into quadrants.  Now, make each quadrant into a burger.  This ensures even sized burgers.  Grill your burgers over medium heat for a few minutes on each side or until your burgers are cooked to your desired doneness.

A minute or so before your burgers are cooked, throw your buns, cut side down, onto the grill so they toast up.  Now’s the time you can put slices of Swiss cheese on your burgers so they melt.

To assemble the burger, top your roll with the burger, then the caramelized onion.  To finish it off, drizzle the balsamic glaze over the onions.

I had some Alexis Sweet Potato fries in my freezer I cooked to serve alongside.  It was one of the best dinners I’d made in a long time.

*Every chef on Food Network suggests using 80/20 ground beef for the correct ratio of meat to fat.  This yields the juiciest, most flavorful burgers.

Brown Sugar Meatloaf 2.0

You may remember my original post for my Brown Sugar Meatloaf.  Well, it’s been upgraded.

The past few times I’ve made this meatloaf, it has been a little…different.  And not good different.  I have tweaked it a lot (omitting the red pepper, grating the onion, increasing the amount of sauce, etc).  I finally think I’ve perfected it!  Here is the new, updated, more tasty version of my meatloaf.  Commence salivation now.

Brown Sugar Meatloaf 2.0

For the loaf:
2 pounds ground sirloin
3/4 cup milk
2 eggs
1.5 tsp salt
1/4 tsp black pepper
1 small onion, finely chopped
1/4 tsp ground ginger
1.5 sleeves Saltines, crushed

For the sauce:
1 cup ketchup
1 cup brown sugar
2 tbsp Worcestershire sauce
2 tbsp apple cider vinegar

For the loaf, start by combining the milk, eggs, salt, pepper, onion, ginger, and Saltines in a mixing bowl.  For convenience, I used my stand mixer.  Once everything is well mixed, add your meat and mix slowly until well combined.

In my previous post I demonstrated how not to squeeze the meat as it would compact it, resulting in a much denser, therefore drier meatloaf.  When using the stand mixer, you don’t have to worry about that as much and you keep your hands clean!  Bonus!

For the sauce, combine all the ingredients above and mix well.
Complicated, right?

To assemble your loaves, start by putting a cooling rack over a baking sheet.  Then, to prevent sticking, I cut some foil to the approximate size I wanted our loaves to be.  I then sprayed them with cooking spray.

The reason I used a cooling rack over a baking sheet was to encourage the “drippings” to run away from the meet.  The meatloaf is moist enough without it and sometimes when the drippings are allowed to stay close to the loaves, it actually results in soggier meatloaf.  Not very tasty.

After your rack is prepared, form your loaves.  I got three two person loaves from 2 pounds.  Shape them to approximately the same size as your foil.  Cover each loaf with a generous amount of sauce.  I used a pastry brush to do this, but you could just use a spoon.  It’s up to you.

Bake at 400º for about an hour, or until the middle reaches 165º.  The reason I like to use a baking sheet instead of a loaf pan is because you can put the sauce on the top, which creates sort of a crust that keeps the meat tender and juicy.  Plus it gets slightly caramelized which, let’s face it, is never a bad thing!

I will probably continue to fool around with this recipe because I can never leave well enough alone.  I have thought about adding garlic, red pepper flakes, hot sauce, ground sage, etc to the meatloaf.  Maybe in time there will be a Version 3.0!

Pin It

What a Crock (Pot Roast)

As you all know, Jeff and I are expecting our first little one in about a month, so I have been scouring the internet for all kinds of easy recipes.  The other day I stumbled (literally…using stumbleupon.com) on a recipe that sounded really good!  Since I was off Friday, I decided to test it out.

This is a quick, simple recipe you can easily throw together in the morning and let simmer all day!  It’s especially good as leftovers, so go ahead and use up that big cut of roast you got on sale the other day.

Marie’s Best Ever Pot Roast

2-5 pound pot roast (any kind)
1 envelope dried ranch dressing mix
1 envelope Italian dressing mix
1 envelope brown gravy mix
Desired veg (She used potatoes and carrots, I added sweet potatoes)
1 to 1.5 cups water

Spray your slow cooker with nonstick cooking spray or use Reynold’s Slow Cooker Liners.  Trust me…it makes clean up so much easier!  Chop your veg into big chunks and place them in the bottom of the pan.

Top your veg with the roast and cover with packets of seasonings and water.  *Last time I didn’t mix the seasonings and water together, but I will the next time I make this.  I found chunks of seasoning on certain parts of the roast and it was just a little overstimulating.  I think mixing all the seasonings and the water together would help distribute the flavors.

Cook on low for 6 hours or until the meat falls apart.

I just picked out what I wanted to eat instead of plating a whole meal (Jeff had already eaten), but if I were to serve this to guests I would probably lift out the meat and veg and place on a serving dish.  Then, I would strain the liquids from the bottom of the pan and turn it into a gravy.  (You can do this easily by combining a tbsp of cornstarch to about 1/2 cup water and whisking it together to remove lumps.  Then add the mixture to the sauce.  Heat the sauce over medium heat while whisking until the gravy is as thick as you’d like.)

One other tip I have for you (and I wish I had taken a picture) is the sandwich I made with the leftovers yesterday!  I had picked up a salted bagel from Dorothy Lane Market, so I turned the bagel into a pot roast sammie.  I cut the bagel in half, topped it with the meat, some worchestershire and provolone, and warmed it in the microwave to melt the cheese.  It was so good!  I think next time I’ll try it with A1 sauce though.  Or horseradish sauce…mmmm…

So, if you’re looking for a quick, easy, crock pot recipe, this one has tons of flavor!  Plus think of all the things you can use the leftover meat for!  Enjoy!


From Russia, With Love

When you see a super thin piece of beef, what is the first meal you think of?  Some people think of steak tacos, some think of beef stir fry.  Me?  I think of one thing:

the Russian originated Beef Stroganoff.

Beef stroganoff is one of my favorite weeknight meals to make because it is simple and easy.  It’s also one of those meals you can prep ahead of time and throw together quickly at the end of a long day.  I tend to make a double batch of sauce so I stretch my buck even further and get two, two, two meals out of one!

Yesterday at the store, I found a super thin piece of beef marked down to $3.82.  It was going to expire on 10/27, so I popped that baby into my cart and earmarked it for tonight’s dinner.  Because I was able to get two meals out of the one piece of beef, I was able to make that $3.82 stretch waaaaaaaay out!  Love it!

Apparently, Beef Stroganoff is one of those meals you can also make in the crock pot.  Well, I must have done something wrong last time I tried this because my husband said the recipe was so bad he couldn’t even choke it down!  Take it from me (and Paula Deen)…this recipe is so quick and easy, it takes no time to throw it together.  Trust me.  Would I lie?

Beef Stroganoff
(adapted from Mrs. Paula Deen herself)

3/4 pound thinly sliced beef, cut into bite sized chunks
Steak Seasoning
Flour
2 tbsp olive oil, divided
2 tbsp butter, divided
1 small onion, finely diced
8 ounces mushrooms, chopped (optional)
1 10 3/4 oz can cream of mushroom soup
1 can-full beef broth (see below)
Salt & pepper to taste
4 oz cream cheese
1 pound egg noodles*

In a large skillet over medium high heat, warm 1 tbsp each of the olive oil and butter.  While the skillet is preheating, cut up your beef.

Season liberally with the steak seasoning (I used my favorite grill seasoning from Dorothy Lane Market.  If you live in the area and haven’t tried it, you are seriously missing out!)

Sprinkle with flour and toss to coat.

Shake off any excess flour and place in the skillet.  Brown on both sides.  Once the meat is browned, remove and drain on a paper towel.

Add the second tbsp of olive oil and butter and then add the onions.  This is also the time you add the mushrooms if you desire.  I desired.  Jeff did not.  Guess who won that debate.  (Let’s be honest…he’s just lucky I didn’t have any mushrooms in the house.)

Once the onions are nice and soft, add a tbsp of flour and mix in.  Add your cream of mushroom soup and then fill up the empty can with beef broth and dump that in.  Mix well and bring to a boil.  Once it is boiling, reduce the heat to low and let simmer, covered, for 30 minutes.

Meanwhile, bring a large pot of water to a boil and cook your egg noodles to the package directions. Once cooked, drain and return to the stock pot.  I try to plan my noodles to be done around the same time as the sauce so they don’t sit in the hot pot too long as they can start bonding to the pot itself.

After your sauce has simmered for 30 minutes, add in your cream cheese and stir to combine.  I let my cream cheese sit in the sauce for a few minutes to soften up and then I stir it.  Honestly, the whipped cream cheese would probably work better for this recipe.

Once your sauce is finished, add it to the drained noodles and toss to combine.  Season with salt and pepper, if needed.

I love beef stroganoff.  I honestly think it’s one of our favorite meals!  It’s definitely comfort food at it’s best.  And Peanut liked it too.  That or he just likes kneeing me a lot!  One thing’s for sure…I love my new camera!

*This recipe is a full recipe that would feed 4 people easily.  For the two of us, I save half the sauce and only make 1/2 a pound of egg noodles, saving the rest for when I make the second half of the recipe.

To view this recipe in an easy to follow format, click here!

Slow Roasted Beef Enchiladas

Have you ever made a beef roast with no plans for it?  Me neither.  Until now.  The other night, in an effort to have a delicious meal waiting for us when we got home, I made a beef roast in the crock pot.  The verdict?  A bit dry unfortunately.  Luckily, Jeff had a date with his brother, so I was on my own for dinner.  I packed up the beef, stuck it in the fridge, and heated up some fried rice instead.  I wasn’t sure what I was going to do with it, but I knew I didn’t want to throw it away.

Tonight, on the way home from my new store (I’m a manager at Walgreens), I had a light bulb moment:  ENCHILADAS!  I stepped on the gas and hurried home.  This meal was super quick to make and I imagine would freeze beautifully!


Slow Roasted Beef Enchiladas

6 oz slow roasted beef, shredded*
1/2 cup salsa
1 can whole kernel corn, drained
1 small can green chilies (not drained)

4 whole wheat tortillas
1/2 cup vegetarian refried beans
1 cup 2% cheddar cheese
1 can green enchilada sauce

Preheat oven to 425º. In a small bowl, mix the beef, corn, green chilies, and salsa.

Spray a 6×9 inch casserole dish with nonstick cooking spray.  Spread 1/8 cup beans on each of the tortillas.

Spread 1/4 of the mixture on each tortilla and roll up.

Place in the dish, cover with enchilada sauce and cheese, and stick in the oven.

Bake for 30 minutes or until cheese is melted and the enchiladas are heated through.

One word sums it up:  DELICIOUS

*I roasted a beef roast in a bottle of Lawry’s Caribbean Jerk marinade mixed with a bottle of water on low for 8 hours in my crock pot.